vue3
脚手架
官方已经将
Vue-CL用于维护状态,推荐使用create-vue来创建基于vite的新项目。
- 安装命令
npm init vue@latest这一指令将会安装并执行
create-vue, 创建一个vue3的新项目。
- 项目结构
基本和vue2项目的结构一致。
/*
- .vscode
- public
- src
	- assets
	- components
	- router
	- stores
	- views
	- App.vue
	- main.js
- index.html
- package.json
- vite.config.js
- vitest.config.js
*/创建应用
- 启动项目
cnpm i #安装依赖
npm run dev #启动项目创建页面
- 创建一个views下的页面,
Hello.vue
基本和vue2类似,区别是,组合式采用
setup,选项式,则用setup替代了data.
- 组合式: 旧式写法
setup()函数
<script>
<!-- 引入ref 和生命周期函数onMounted -->
import { ref,onMounted } from 'vue'
export default {
	setup(){
		<!-- 使用 ref 定义响应式数据对象, -->
		const name = ref('wc');
		<!-- 生命周期函数 -->
		onMounted(()=>{
			<!-- 使用数据对象的value属性,获取值 -->
			alert(name.value)
		});
		return {
			name //将name暴露出来才能使用
		}
	}
}
</script>

<template>
    <div class="hello">
      <h1>This is an {{name}} page</h1>
    </div>
</template>- 组合式: 新写法
script后面标明setup
<script setup>
import { ref,onMounted } from 'vue'
const name = ref('hello');
onMounted(()=>{
	name.value
	alert(name.value)
});
</script>

<template>
    <div class="hello">
      <h1>This is an {{name}} page</h1>
    </div>
</template>创建路由
- 在路由文件下,添加相应的路由
路由文件和vue2一致,只不过现在需要按需引入,并且使用
createRouter和createWebHistory创建路由和history模式,更加清晰。
// 按需引入
import { createRouter, createWebHistory } from 'vue-router'
import HomeView from '../views/HomeView.vue'

// 创建路由对象
const router = createRouter({
  history: createWebHistory(import.meta.env.BASE_URL),
  routes: [
    {
      path: '/',
      name: 'home',
      component: HomeView
    },
    {
      path: '/about',
      name: 'about',
      component: () => import('../views/AboutView.vue')
      // 支持懒加载
    },
    {
      path: '/hello',
      name: 'hello',
      component: () => import('../views/HelloView.vue')
      // 支持懒加载
    }
  ]
})

export default router引入路由
- App.vue
首先,按需引入
RouterLink和RouterView
<!-- 使用RouterLink 代替vue2的router-link, 用法是一样的,to指定路由 -->
<script setup>
import {RouterLink, RouterView} from 'vue-router'
</script>

<template>
	<RouterLink to='/hello'>Hello <RouterLink>
	<RouterView />
</template>v-bind新用法
相比于vue2,v-bind可以动态绑定多个值
const objectOfAttrs = {
  id: 'container',
  class: 'wrapper'
}- 通过不带参数的v-bind,可以一次性绑定多个值,
- 缺点是不便于阅读,优点是当标签的属性过多时,非常有用。
<div v-bind="objectOfAttrs"></div>- Hello.vue组件中测试
<!-- 定义一个对象,接收多个值 -->
<script setup>
const hA = {
    class: 'active',
    title: 'this is a title',
    style: 'color: red;'
}
</script>

<!-- 在模板中,v-bind="" 不带参数的绑定 -->
<template>
    <div class="hello">
        <h1 v-bind="hA">This is an hello page</h1>
    </div>
</template>

<!-- 定义 active样式 -->
<style scoped>
.active {
    font-weight: 900;
}
</style>动态参数(属性)
使用
[]添加动态属性,vue会计算[]内的值,动态修改绑定的属性
可以用于v-on和v-bind等多种指令
- 例如,使用动态属性,设置动态事件
<a v-on:[eventName]="doSomething"> ... </a>

<!-- 简写 -->
<a @[eventName]="doSomething">...</a>在此示例中,当 eventName 的值是 "focus" 时,v-on:[eventName] 就等价于 v-on:focus。
- 例如,我要给
h1添加点击或hover事件,根据父组件使用的条件传入props - vue3中定义props,使用
defineProps({})方法,传入对象包裹所有props
<!-- vue3中定义props的方式,旧:props属性,新:引入defineProps方法-->
export default {
  props: ['title'],
  setup(props) {
    console.log(props.title)
  }
}

<script setup>
import { defineProps } from 'vue'
defineProps({
	events: {
		type: String,
		required: true,
		default: 'click'
	}
})
</script>


<!-- 添加动态属性[events] -->
<h1 v-on:[events]="handleEvent">This is an hello page</h1>props
vue3中,
<script setup>写法,引入definePorps()函数定义props,可直接使用。
如果是旧写法, 则写在props属性上。 使用时,需要将props传入到setup()内。
<!-- 旧:props属性,-->
export default {
  props: ['title'],
  setup(props) {
    console.log(props.title)
  }
}

<!--新:引入defineProps方法-->
<script setup>
import { defineProps } from 'vue'
defineProps({
	events: {
		type: String,
		required: true,
		default: 'click'
	}
})
</script>


<!-- 添加动态属性[events] -->
<h1 v-on:[events]="handleEvent">This is an hello page</h1>事件处理
- 旧: 定义函数,并且暴露出去
import { ref } from 'vue'
export default {
	setup(){
		const count = ref(0)
		function increment(){
			count.value++
		}
		// 不要忘记暴露出去,才能调用
		return {
			count,
			increment
		}
	}
}<button @click="increment"> {{count}} </button>- 新:定义函数即可使用
<script setup>
import { ref } from 'vue'

const name = ref('hello');
function handleFn() {
    console.log(123)
}
</script>

<h1 v-on:click="handleFn()">This is an {{ name }} page</h1>响应式基础
vue3中通过引入
ref和reactive函数,实现响应式。
ref: 当一个组件首次渲染时,Vue 会追踪在渲染过程中使用的每一个 ref。然后,当一个 ref 被修改时,它会触发追踪它的组件的一次重新渲染。
reactive: 与ref 不同,reactive() 将使对象本身具有响应性,因此可以直接使用,而不用ref.value.
<script setup>
import { ref, reactive, nextTick } from 'vue'
const state = reactive({ count: 0 })
const num = ref(0);

async function increment() {
  num.value++
  await nextTick()
  // 现在 DOM 已经更新了,可以直接拿到更新后的值。
  console.log(num.value) //1
}
</script>

<template>
	<div>
		<h1>{{num.value}}</h1>
		<h1>{{state.count}}</h1>
		<button @click = "increment">{{num.value}}</button>
	</div>
</template>何时使用ref,何时reactive?
reactive将引用数据类型值变为响应式,使用proxy,代理给一个对象,触发get和set实现。ref将基本类型和引用数据类型都变为响应式,通过先给数据套一个对象外壳,这个对象只有value属性。然后一样,借用reactive的方法,实现响应式。
- 如
数字,字符串,boolean等要用ref,reactive不支持基本类型数据 - 变量为
Object时,推荐使用reactive来定义 - 变量为
Array数组时,- 后期要经常修改时,推荐用
ref。 - 只是展示用,推荐用
reactive。
- 后期要经常修改时,推荐用
nextTick()-DOM更新
nextTick(): 等DOM更新完再执行额外的代码。
vue的自动更新不是同步的,跟react的setState()一样,vue会收集一段时间内的变化,最后只更新一次。以确保不管你进行了多少次状态修改,每个组件都只会被更新一次。
计算属性
引入computed方法,在方法内
传入一个函数,作为计算属性的函数内容。
返回的结果,赋值给变量,作为计算属性。
返回的也是一个ref,具有响应式,在下面可以使用计算属性.value获取到值。
<script setup>
import { ref, onMounted, computed } from 'vue'
const num = ref(4);

<!-- 定义计算属性:cc, 在computed方法内 -->
const cc = computed(()=>{
	return num > 5 ? 'num大于5' : 'num小于5'
});

onMounted(()=>{
	<!-- 拿到计算属性的值 -->
	console.log(cc.value)
});
</script>

<template>
	<h1> {{cc}} </h1>
</template>计算属性vs方法
计算属性的值,依赖于
return内的响应式对象的值,因此,只要该ref或reactive对象的值不变更,都不会重新计算。
方法: 函数调用,每次调用都会重新计算和渲染。因此适用于使用次数少的情况下。
类和样式绑定
class和style都是标签上的属性,因此均使用v-bind指令绑定。
绑定class
绑定对象
可以给
:class绑定一个对象,对象的属性是否存在,取决于属性值的真假值
<div :class="{acitve: isActive}"> </div>
<!-- 由于v-bind后,""里面的语句,自动会当成变量或者表达式 -->
<!-- 如果传递了一个对象,则将对象属性的属性值当成变量,转换计算布尔值,
根据结果真假决定该属性是否存在 -->
<script setup>
import { ref } from 'vue'
const isActive = ref(false);
const isLink = ref(1);
</script>

<div class="h1" :class="{acitve: isActive, link: isLink}">aa</div>
<!-- <div class="h1 link"></div> -->因此,也可以利用
reactive的创建响应式对象,直接绑定该对象。
<script setup>
import { reactive } from 'vue'
const myClass = reactive({
	active: false,
	link: true
})
</script>

<div class="h1" :class="myClass">aa</div>
<!-- <div class="h1 link"></div> -->同样,可以绑定一个
计算属性, 根据响应式对象或者props决定是否渲染该样式,这是设计组件库常用的手段。
<script setup>
import {ref, computed} from 'vue'
const error = ref(4)

const classCC = computed(() => {
	return {
		active: error > 4 ? true : false,
		link: error > 2 ? true : false
	}
});
</script>

<div class="h1" :class="classCC">aa</div>绑定数组
绑定对象时,是通过属性的属性值的布尔值来决定,是否设置该属性样式
而绑定数组时,可以直接将对象包裹起来,也可以单个列举变量,其变量值作为样式。
<script setup>
import {ref, computed} from 'vue'
const isActive = ref(false)
const linkClass = ref('link')

</script>

<div class="h1" :class="[{active:isActive}, linkClass]">aa</div>绑定style
:style支持绑定内联样式
绑定对象
推荐使用camelCase, 当然也可以使用kebab-cased 形式。
根据对象中样式属性的属性值,决定该样式
<script setup>
import {ref} from 'vue'
const activeColor = ref('red')
const fontSize = ref(30)
</script>
<div :style="{fontSize: fontSize + 'px', color: activeColor}">123</div>和绑定
class一样,可以直接绑定一个响应式样式对象, 便于修改。
同理,如果有更复杂的逻辑,可以绑定一个计算属性。
const styleObject = reactive({
	color: 'red',
	fontSize: '13px'
});<div :style="styleObject"></div>更好的兼容性
支持一个样式属性,绑定多个样式值, 采用
数组将样式值包裹起来,仅会渲染浏览器支持的最后一个值。
<div :style="{display: ['-webkit-box', '-ms-flexbox', 'flex']}"></div>与Vue2一致的部分
其中:条件渲染(例如
v-if), 列表渲染(例如v-for), 表单输入绑定(例如v-model)和vue2一致。
生命周期
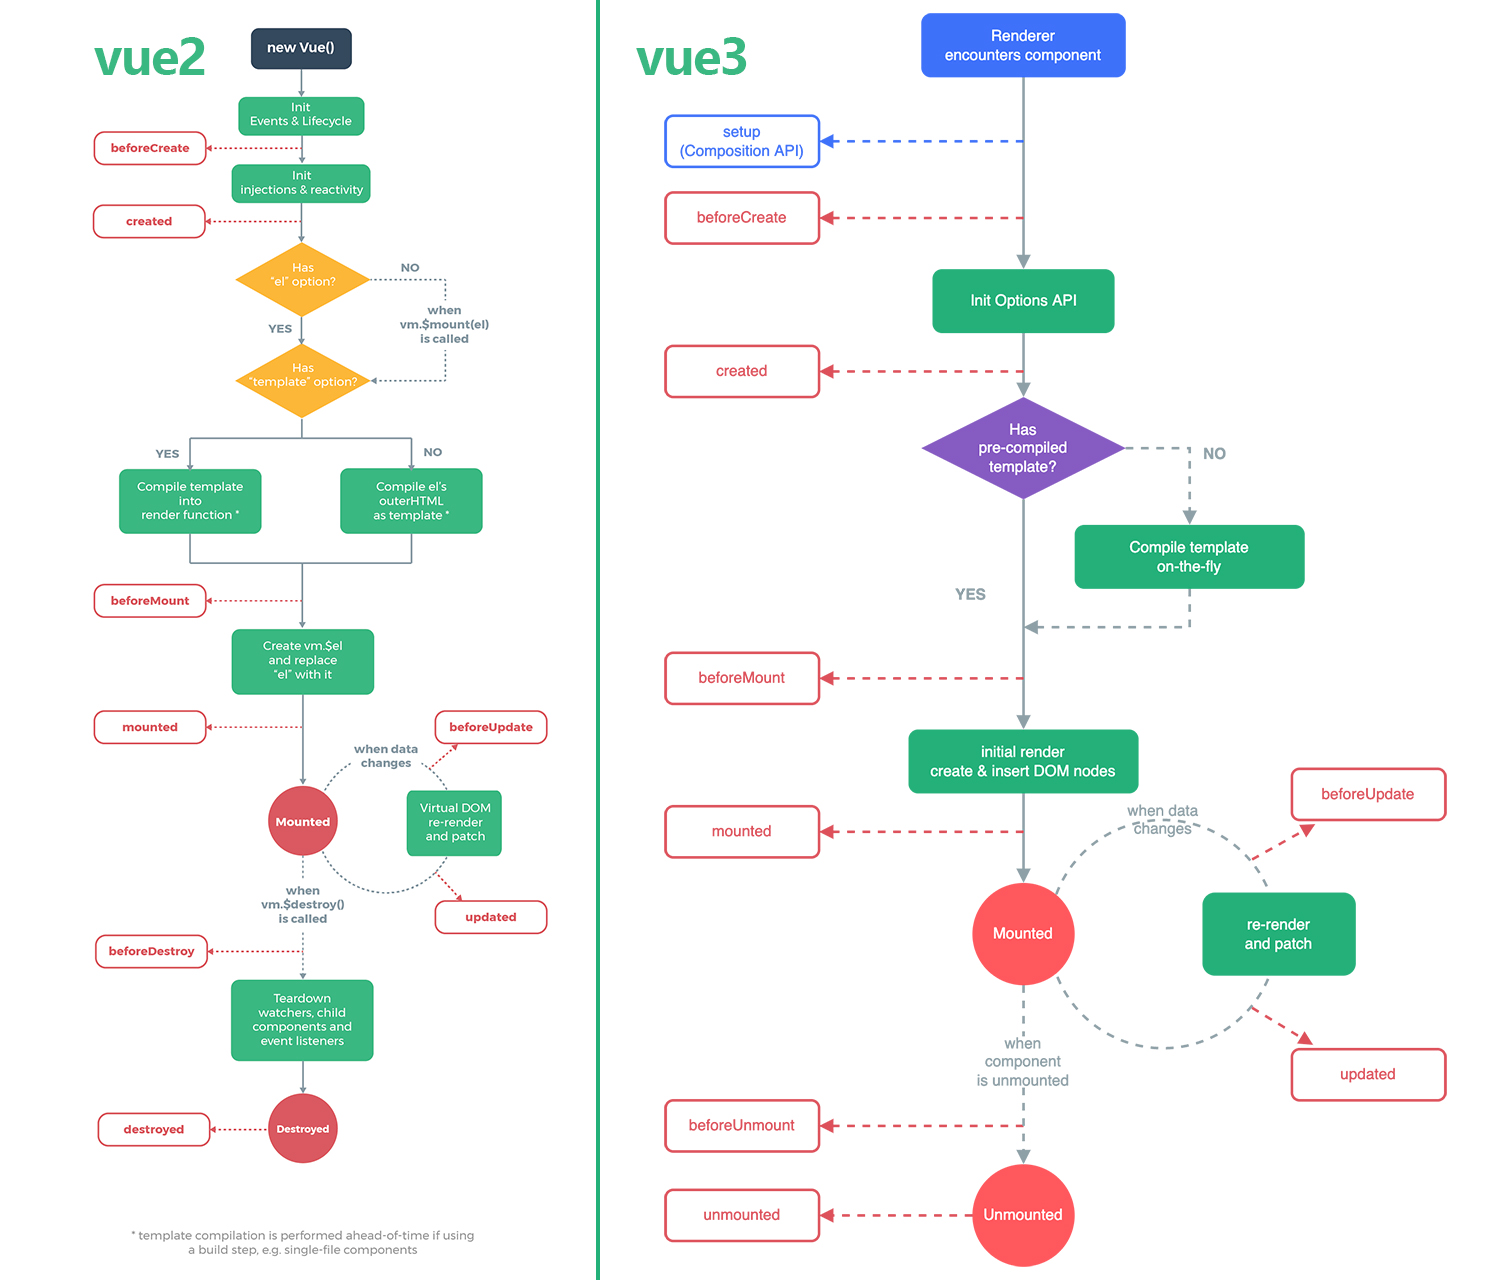
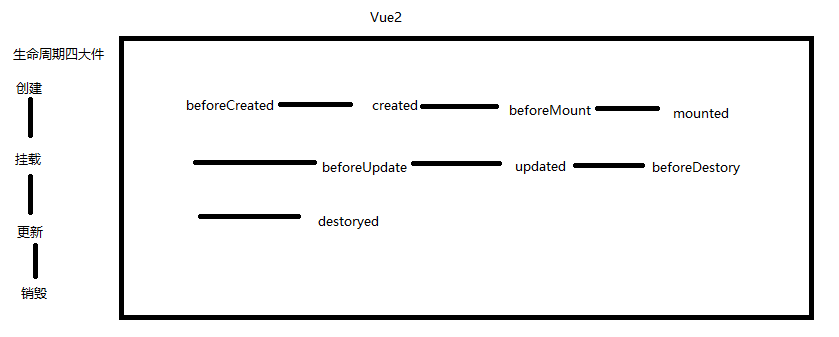
生命周期一般围绕四大件(创建,挂载,更新,销毁)
vue2的生命周期函数
beforeCreate: 在实例初始化之后,进行数据侦听和事件/侦听器的配置之前同步调用。created: 在实例创建完成后,被立即同步调用。此时已经完成了Vue实例的配置项设置,但是没有挂载,$el属性此时不可用。beforeMount: 在挂载之前被调用,相关的render函数,首次被调用。mounted:当前实例被挂载后调用, 此时不保证所有的子组件也都被挂载完成。如果要整个子组件都渲染完后执行一些操作,可以使用this.$nextTick(function () {xxx})beforeUpdate:数据发生更改后,调用render()函数更新DOM之前,被调用。 比如移除手动添加的事件监听器。updated:数据更改, 导致的虚拟DOM 重新渲染和更新,完毕之后被调用。同理,仅指当前组件更新,如果要子组件更新后操作,this.$nextTick()beforeDestory:实例销毁之前被调用,一般用于清除定时器等等。destroyed:实例销毁后。被调用
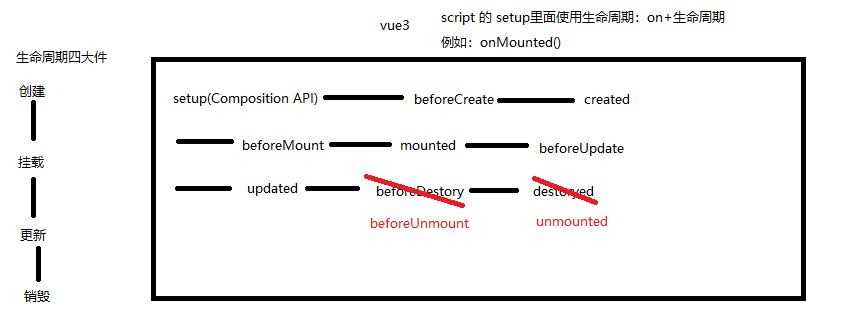
vue3的生命周期函数
函数名与
vue2基本一致,只将destory修改为了unmounted。
onBeforeCreate(): 注册一个钩子,在组件被挂载之前被调用。onCreated(): 注册一个钩子,在组件被挂载之前被调用。onBeforeMount(): 注册一个钩子,在组件被挂载之前被调用。onMounted(): 注册一个回调函数,在组件挂载完成后执行onBeforeUpdate(): 注册一个钩子,在组件即将因响应式状态变更而更新DOM 树之前调用。onUpdated(): 注册一个回调函数,在组件因为响应式状态变更而更新其 DOM 树之后调用。onBeforeUnmount(): 注册一个钩子,在组件实例被卸载之前调用。onUnmounted(): 注册一个回调函数,在组件挂载完成后执行。
<!-- 使用前引入对应的生命周期函数 -->
<script setup>
	import { onMounted } from 'vue'
	onMounted(()=>{
		console.log('onMounted');
	});
</script>vue2与vue3图示
vue2(左) + vue3(右)

vue2简图

vue3简图

监听器
和vue2一样,vue2是
watch属性,vue3是watch函数
允许每次响应式状态发生变化时触发相应的回调函数。
watch函数接收两个参数,- 参数一: 监听对象或者对象的getter函数,
- 参数二:回调函数,接收一个参数作为监听对象的新值。
监听单个数据源
import { ref, watch } from 'vue'
const x = ref(0)

watch(x, (newX) => {
  console.log(`x is ${newX}`)
})监听一个getter函数,将其返回值作为新值参数,监听起来。
import { ref, watch } from 'vue'

const x = ref(0)
const y = ref(1)
watch(
  () => x.value + y.value,
  (sum) => {
    console.log(`sum of x + y is: ${sum}`)
  }
)监听多个数据源,需要组成一项数组, 同样新值参数也要写成一项数组。
import { ref, watch } from 'vue'
const x = ref(0)
const y = ref(1)

watch(
  [x,() => y.value],
  ([newX, newY]) => {
    console.log(`x is ${newX} and y is ${newY}`)
  }
)注意
不能
直接监听响应式对象的属性值,
应该监听响应式对象或者getter函数,或者它两组成的数组。
const obj = reactive({ count: 0 })

// 错误,因为 watch() 得到的参数 是一个 number, 不符合监听类型
watch(obj.count, (count) => {
  console.log(`count is: ${count}`)
})

// 修改为getter函数
watch(
  () => obj.count,
  (count) => {
    console.log(`count is: ${count}`)
  }
)即使回调的监听器
watch默认是懒执行的,只有数据发生变化,才会执行。
很多时候,我们想请求远程的一些数据,例如:请求到数据后,修改响应式数据,触发watch。watch()函数支持传入第三个参数,{ immediate: true }配置对象,用于让watch立即触发一次。
watch(source, (newValue, oldValue) => {
  // 立即执行回调函数,且当 `source` 改变时, 再次执行
}, { immediate: true })watchEffect()
- 举个,使用
立即执行回调函数的监听器的例子。
import {ref, watch} from 'vue'
const todoId = ref(1)
const data = ref(null)

watch(todoId, async () => {
  const response = await fetch(
    `https://jsonplaceholder.typicode.com/todos/${todoId.value}`
  )
  data.value = await response.json()
}, { immediate: true })

// 以上表示立即执行监听器的回调函数,获取数据后,
// 且如果todoId后续会发生变更,就再执行一遍监听器的回调函数。- 虽然可以,但每次都要配置
{ immediate: true },非常麻烦。 - vue设计了一个
watchEffect()函数,来代替即使执行回调的监听器。
watchEffect()只需要传入回调函数作为一个参数。watchEffect()自动跟踪回调函数里面的响应式对象(依赖),并且创建该响应式对象时立即执行。
import {ref, watchEffect} from 'vue'
const todoId = ref('');
const data = ref('');
watchEffect(async () => {
  const response = await fetch(
    `https://jsonplaceholder.typicode.com/todos/${todoId.value}`
  )
  data.value = await response.json()
})watchPostEffect()
默认情况下,
监听器是在DOM更新之前被调用,因此无法访问Vue更新后的DOM。 在watch或者watchEffect的回调函数里面,
如果更新后的DOM,需要指定flush: 'post'选项
watch(source, callback, {
  flush: 'post'
})

watchEffect(callback, {
  flush: 'post'
})- 因此,vue设计了
watchPostEffect()
import { watchPostEffect } from 'vue'

watchPostEffect(() => {
  /* 在 Vue 更新后执行 */
})模板引用ref
在vue2中,我们可以给DOM添加
ref属性,this.$refs.xxx获取DOM.
在vue3中,该ref属性一样有效,但是不需要使用this.$refs.xxx, 而是声明一个同名的响应式对象。
使用ref对象.value拿到该DOM
普通DOM的模板引用
- 使用
<script setup>
<script setup>
import { ref, onMounted } from 'vue'
const input = ref(null)

onMounted(()=>{
	// 使用响应式对象.value,使用DOM元素
	input.value.focus();
})

</script>
<template>
	<input ref="input">
</template>- 不使用
<script setup>, 则需要返回该响应式对象
export default {
  setup() {
    const input = ref(null)
    // ...
    return {
      input
    }
  }
}v-for的DOM,使用ref
注意: 使用了v-for的DOM元素,使用
ref时,需要定义一个数组作为同名的响应式对象的value值。
<script setup>
import { ref, onMounted } from 'vue'
// 由于使用了v-for,所以需要默认为数组。
const li = ref([])
// 遍历的响应式对象。
const list = ref([1,2,3,4,5])

onMounted(()=>{
	// 使用响应式对象.value,使用DOM元素
	li.value.focus();
})
</script>
<template>
	<li v-for="item in list" ref="li">
		{{item}}
	</li>
</template>函数模板引用
除了将
ref赋值给一个字符串,也可以赋值给函数。
该函数接收一个参数,函数体内将参数赋值给数据属性,或者ref变量
???没有理解其作用,和使用的意义。
<template>
	<li v-for="item in list" ref="(el)=>{ li = el; }">
		{{item}}
	</li>
</template>组件上的模板引用
还可以将
ref写在一个子组件上,引用整个子组件。 和普通DOM的模板引用一样,创建同名的响应式对象。
<script setup>
import { ref, onMounted } from 'vue'
import Child from './Child.vue'

const child = ref(null)

onMounted(() => {
  // child.value 是 <Child /> 组件的实例
})
</script>

<template>
  <Child ref="child" />
</template>组件
不再需要使用
component属性,绑定局部和全局组件
setup之前,引入即可直接使用。
定义组件
- 使用构建步骤
- 不使用构建
<!-- 使用构建步骤时,一个单独的 .vue 文件就是组件 -->
<script setup>
import { ref } from 'vue'

const count = ref(0)
</script>

<template>
  <button @click="count++">You clicked me {{ count }} times.</button>
</template>

<!-- 不使用构建时,可以在template属性绑定或者定义 -->
import { ref } from 'vue'

export default {
  setup() {
    const count = ref(0)
    return { count }
  },
  template: `
    <button @click="count++">
      You clicked me {{ count }} times.
    </button>`
  // 也可以针对一个 DOM 内联模板:
  // template: '#my-template-element'
}全局组件和局部组件
- 全局组件: 使用
app.component()注册全局组件。
// 一般在main.js注册全局组件
// 引入createApp创建Vue应用实例
import { createApp } from 'vue'
const app = createApp({
	data() {
	    return {
	      count: 0
	    }
	}
})

// 注册全局组件
app.component('MyComponent', {
	// 组件实例的内容
})
// 也可以引入已经写好的.vue文件
import MyComponent from './component/MyComponent.vue'
app.component('MyComponent', MyComponent)

// 支持链式调用
app.component('ComponentA', ComponentA)
  .component('ComponentB', ComponentB)
.component('ComponentC', ComponentC)- 局部注册:
- 单个
.vue组件,作为局部组件引入 - vue2中使用
Vue.extend()或者单独的对象可以定义局部组件。 - vue3中使用
defineComponent()定义局部组件。
- 单个
<script setup>
// 使用单文件组件
import ComponentA from "./components/ComponentA.vue"
import {ref,h} form 'vue'
const Hello = defineComponent({
		// <script setup> 中一样使用组合式 API
		(props) => {
			const count = ref(0);
			render: ()=>{
				return h('div',{},count.value)
			}
		},
		// 或者继续使用选项式
		props: {

		}
	});
</script>

<template>
	<div class="father">
		<ComponentA />
	</div>
</template>

//如果没有使用setup, 则使用components显式注册,和vue2一样
<script>
import ComponentA from './ComponentA.js'

export default {
  components: {
    ComponentA
  },
  setup() {
    // ...
  }
}
</script>传递props
父传子
- 使用
<script setup>, 引入defineProps({})。 - 不使用时,使用
props选项的方式声明,在setup函数上,传入props作为参数。
const props = definedProps(['title']);
console.log(props.title);

export default {
  props: ['title'],
  setup(props) {
    console.log(props.title)
  }
}传递事件
子传父, vue2: 子组件使用
this.$emit()触发父组件的自定义属性,进而触发父组件的事件。
或者使用provide和inject, 实现跨组件传递数据。
vue2
<!-- vue2案例 -->
<!-- father.vue -->
<template>
	<div>
		<Son @events="handleFn"></Son>
	</div>
</template>
<script>
	new Vue({
		el: "#app",
		methods:{
			handleFn(val){
				console.log(val); //123
			}
		}
	});
</script>

<!-- son.vue -->
<template>
		<h1 @click="handleFn"></h1>
</template>
<script>
	new Vue({
		el: "#app",
		methods:{
			handleFn(){
				this.$emit('events','123'); //将123数据作为第二个参数,传递给父组件。
			}
		}
	});
</script>vue3中
- (1)和vue2一样,使用
$emit(),但是写在行内上。 - (2)
新setup:- 引入
defineEmit([])显示定义传递的事件, - 然后事件内使用
emit()方法代替this.$emit();
- 引入
旧setup:- 使用
emits:属性,定义要提交的事件。 - 在
setup({emit})中,解构出{emit}作为参数,setup函数内使用emit()方法。
- 使用
<!-- 方式一: 行内直接触发 $emit() -->
<!-- Son.vue -->
<h1 @click="$emit('events','123')"></h1>

<!-- Father.vue -->
<son @events="handleFn">
<script setup>
const handleFn = function(val){
	console.log(val)
}
</script><!-- 方式二: 引入defineEmit([]),显式定义和触发事件 -->
<!-- Son.vue -->
<h1 @click = "sonHandleFn"></h1>
<script setup>
import { defineEmit } from 'vue'
defineEmit(['events']);
const sonHandleFn = function(){
emit('events','123')
}
</script>
<!-- 旧式setup -->
<script>
export default {
emits: ['events'],
setup({emit}){
emit('events')
}
}
</script>
<!-- Father.vue -->
<son @events="handleFn"></son>
<script setup>
const handleFn = function(val){
console.log(val) //123
}
</script>组件上的v-model
通过
v-model在组件上绑定响应式传值。
vue2中element-ui设计input组件时,有类似的写法. vue2子组件使用model属性,定义prop和event.同时定义props和$emits()
<!-- 父组件 -->
<el-input v-model="msg">{{msg}}</el-input>
<!-- Input.vue -->
<div class="">
<!--
   需要注意的点就是:
   1.input使用的 :value,
   2.下面的change名,要和下面的model中的event保持一致
   3.text1属性要对应起来
-->
  <input type="text" :value="text1" @input="$emit('change', $event.target.value)" />
</div>
<script>
export default {
  data() {
    return {};
  },
  //用来告诉组件自己依赖的数据和调用的方法
  model: {
    prop: "text1",
    event: "change",
  },
  //用来接收父组件传递的值的,接收的名字自己可以随意取
  props: {
    text1: String,
    default: () => {
      return "";
    },
  },
  methods: {},
};
</script>vue3中,不再需要使用
model属性作为声明.
机制还是一样的, 使用defineProps和defineEmits,modelValue为自定义props属性.
<!-- 原生写法 -->
<input v-model="searchText" />
<!-- 以上写法模板编译器会编译,等价于如下代码 -->
<input
  :value="searchText"
  @input="searchText = $event.target.value"
/>

<!-- 而在组件上使用时-->
<CustomInput v-model="searchText" />
<!-- 会被展开为  -->
<CustomInput
  :modelValue="searchText"
  @update:modelValue="newValue => searchText = newValue"
/>

<!-- 因此,其实等价于经历了 父子传值和子父传值 -->
<!-- 因此,子组件内应该这样设计,才能让v-model在组件上生效. -->
<!-- CustomInput.vue -->
<script setup>
defineProps(['modelValue'])
defineEmits(['update:modelValue'])
</script>

<template>
  <input
    :value="modelValue"
    @input="$emit('update:modelValue', $event.target.value)"
  />
</template>$event.target.value指事件冒泡机制.- 利用上面的特性,
使用组件时可以绑定多个v-model, 只要在组件内定义多个props即可.
<!-- vue3 官网实例 -->
<!-- App.vue使用UserName组件 -->
<UserName
  v-model:first-name="first"
  v-model:last-name="last"
/>

<!-- UserName.vue 组件 -->
<script setup>
defineProps({
  firstName: String,
  lastName: String
})

defineEmits(['update:firstName', 'update:lastName'])
</script>

<template>
  <input
    type="text"
    :value="firstName"
    @input="$emit('update:firstName', $event.target.value)"
  />
  <input
    type="text"
    :value="lastName"
    @input="$emit('update:lastName', $event.target.value)"
  />
</template>属性透传
当
使用组件时, 传递了属性, 而定义组件内没有用props或emit或v-on接收,
其属性就会透传到组件内部,也可以理解为继承.v-on监听继承: 当没有用emit机制,则事件会传递.
<!-- 常见的用于class、style 和 id。 -->
<MyInput class="active"/>
<!-- MyInput内没有接收的话,自动透传 -->
<input class="active">

<!-- 如果input内部定义了class,则会合并 -->
<input class="ipt active">

<!-- v-on监听继承 -->
<MyButton @click="onClick" />

<!-- button内部,当button被点击时,除了自己的会触发,也会触发透传的onClick事件. -->
<button>点我</button>- 禁用透传:
- 在组件
选项中设置inheritAttrs: false - (3.3版本后,
defineOptions({})API中设置)
- 在组件
<script setup>
defineOptions({
  inheritAttrs: false
  // 组件内部禁用透传
})
// ...setup 逻辑
</script>插槽
和
vue2中一致,默认插槽,具名插槽,动态插槽名和作用域插槽
<!-- 向具名插槽内,传入props数据 -->
<MyComponent>
  <template #header="headerProps">
  <!-- 给插槽名赋值props, ="headerProps"  -->
    {{ headerProps }}
    <!--  -->
  </template>
</MyComponent>

<!-- 组件内部 -->
<slot name="header" message="hello"></slot>
<!-- 此时headerProps表示{message: 'hello'} -->依赖注入
vue2中,
provide(依赖)和inject(注入) 分别表示父子组件的选项 vue3中,可以引入它俩,并且作为函数使用.
<script setup>
import { provide } from 'vue'
// 使用provide
provide(/* 注入名 */ 'message', /* 值 */ 'hello!')
// 一个组件可以多次调用 provide(),使用不同的注入名,注入不同的依赖值。
provide(/* 注入名 */ 'name', /* 值 */ 'wc')
</script>- 全局
provide,在应用层定义
import { createApp } from 'vue'
const app = createApp();
app.provide(/* 注入名 */ 'name', /* 值 */ 'wc');inject注入, 使用变量接收,可以带默认值
<script setup>
import { inject } from 'vue'
// 使用inject
const msg = inject('message', '默认值');
// msg 则表示hello, 如果provide为设置,使用默认值.
</script>- 一次性依赖注入
多个数据类型.
<!-- 依赖 -->
<script setup>
import {ref, provide} from 'vue'
const address = ref('jaingxi')
function handleFn(){
	alert(123);
}
provide('all', {
	address,
	handleFn
})
</script>

<!-- 注入 -->
<script setup>
import {inject} from 'vue'
const { address,handleFn } = inject('all');
// 解构赋值
</script>异步组件
异步组件: 当需要该组件时,才从服务器请求组件。
vue3中使用defineAsyncComponent实现异步组件,该方法接收一个返回Promise的加载函数。
由于ES模块动态导入(import()函数)也会返回一个Promise, 因此常常和其一起使用
// 原理
import { defineAsyncComponent } from 'vue'

const AsyncComp = defineAsyncComponent(() => {
  return new Promise((resolve, reject) => {
    // ...从服务器获取组件
    resolve(/* 获取到的组件 */)
  })
})
// ... 像使用其他一般组件一样使用 `AsyncComp`- 配合ES6模块导入一起使用
- 局部组件
// 配合ES6模块动态导入一起使用
import { defineAsyncComponent } from 'vue'

const AsyncComp = defineAsyncComponent(() =>
  import('./components/MyComponent.vue')
)- 全局组件
异步组件也可以像普通组件一样,使用
app.component全局注册:
app.component('MyComponent', defineAsyncComponent(()=> import('./components/MyComponent.vue') )) XDocs
XDocs